Using Custom JWTs with Neon RLS Authorize
A step-by-step guide for using custom JWTs with Neon RLS Authorize
Demo project
Neon RLS Authorize lets you implement authorization directly within your Postgres database using Row-Level Security (RLS). While it works well with authentication providers like Auth0 and Clerk, you can also use your own custom-generated JSON Web Tokens (JWTs). This gives you fine-grained control over how tokens are created and validated, ideal for specific application needs or when you prefer to manage authentication independently.
This guide walks you through using custom JWTs with Neon RLS Authorize, covering:
- Generating keys for JWT signing
- Creating custom JWTs with specific claims
- Configuring Neon RLS Authorize to validate your JWTs
- Authenticating requests and enforcing RLS policies based on JWT claims
When to use custom JWTs
- Full control: You control your JWTs' structure, claims, and signing process, which is useful when standard providers don't meet your needs.
- Reduced external dependencies: Custom JWTs can reduce reliance on external services, especially for internal tools.
- Tailored security policies: Align JWT generation and validation precisely with your application's unique security requirements
- Simplified architecture in specific cases: For some applications, particularly internal tools or those with existing authentication mechanisms, using custom JWTs can eliminate the need for integrating a separate, full-featured authentication service
Prerequisites
Before starting, make sure you have:
Generate keys for signing JWTs
JWTs are digitally signed to ensure they're authentic and haven't been tampered with. You'll need a public/private key pair for this:
- Private key: Used to sign your JWTs. Keep this secret!
- Public key: Used by Neon RLS Authorize to verify the signatures.
We'll use the jose library in TypeScript to generate an RSA key pair. Here's a simple way to do it:
import { generateKeyPair, exportJWK } from 'jose';
import fs from 'fs';

// Function to generate a new RSA key pair, converts the keys to JWK (JSON Web Key) format,
// adds necessary metadata, and saves them to separate files.
async function generateAndExportKeys() {
  // Generate a new RSA key pair using the RS256 algorithm.
  const { publicKey, privateKey } = await generateKeyPair('RS256', { extractable: true });

  // Convert the generated keys to JWK format
  const privateJwk = await exportJWK(privateKey);
  const publicJwk = await exportJWK(publicKey);

  // Add metadata to the private key JWK.
  // 'use': Indicates the key's intended use (e.g., 'sig' for signing).
  // 'kid': A unique identifier for the key, useful for key management and rotation.
  // 'alg': Specifies the algorithm to be used with the key (Neon RLS Authorize supports only RS256 and ES256 currently).
  privateJwk.use = 'sig';
  privateJwk.kid = 'my-key-id';
  privateJwk.alg = 'RS256';

  // Add the same metadata to the public key JWK for consistency.
  publicJwk.use = 'sig';
  publicJwk.kid = 'my-key-id';
  publicJwk.alg = 'RS256';

  // Save the keys to separate JSON files.
  fs.writeFileSync('privateKey.jwk.json', JSON.stringify(privateJwk, null, 2));
  fs.writeFileSync('publicKey.jwk.json', JSON.stringify(publicJwk, null, 2));

  console.log('Keys generated and saved to files.');
}

generateAndExportKeys();
Here's what the code does:
- We generate an RSA key pair using the
RS256algorithm. - We convert the keys to JSON Web Key (JWK) format, a standard way to represent keys.
- We add
kid(Key ID) andalg(Algorithm) to the keys for better management. - We save the keys to JSON files.
Security Tips
- Never share your private key. Anyone with it can create valid JWTs.
- Rotate your keys regularly to improve security.
Create your custom JWTs
Now, let's create JWTs in your application. These JWTs will contain "claims" – pieces of information that Neon RLS Authorize will use to enforce your security rules.
Here's an example using jose, adapted from the demo app:
import { SignJWT } from 'jose';

async function createJWT(userId: string, tenantId: string) {
  // Load the private key securely (don't hardcode it!)
  const privateKey = JSON.parse(c.env.PRIVATE_KEY);

  const jwt = await new SignJWT({
    tenant_id: tenantId, // Example custom claim
    // Add any other claims your app needs
  })
    .setProtectedHeader({ alg: 'RS256', kid: 'my-key-id' })
    .setSubject(userId) // The user ID
    .setExpirationTime('1h') // Set an expiration time
    .setIssuedAt()
    .sign(privateKey);

  return jwt;
}

// Example usage:
const token = await createJWT('user-123', 'tenant-456');
console.log('JWT:', token);
Let's break it down:
- We load the private key from environment variables (never hardcode it).
- We create a new JWT and add custom claims. Here, we add a
tenant_id. - We set the algorithm (
alg), key ID (kid), subject (sub- usually the user ID), expiration time (exp), and issue time (iat). - We sign the JWT with the private key.
Custom Claims: Add information relevant to your access control. Common claims include:
tenant_id: For multi-tenant apps.role: User's role (e.g., "admin", "viewer").permissions: Specific actions the user can perform.
Set up Neon RLS Authorize
Now, let's configure Neon RLS Authorize to trust your custom JWTs:
Expose Your Public Key
Neon RLS Authorize needs your public key to verify JWT signatures. You'll usually expose it via a JWKS (JSON Web Key Set) endpoint. A JWKS endpoint is a standard way to publish your public keys so that services like Neon RLS Authorize can retrieve them. The demo app uses a Cloudflare Worker for this, serving the key at /.well-known/jwks.json.
// Example from the demo app (src/index.ts)
app.get('/.well-known/jwks.json', async (c) => {
  const publicKeyJwk = JSON.parse(c.env.PUBLIC_KEY); // Load from environment variable
  const jwks = { keys: [publicKeyJwk] };
  return c.json(jwks);
});
This makes the public key available at https://your-app.com/.well-known/jwks.json.
Add JWKS url to Neon RLS Authorize
- Go to the Neon Console, navigate to Settings > RLS Authorize.
- Click Add Provider.
- Set the JWKS URL to your endpoint (e.g.,
https://your-app.com/.well-known/jwks.json).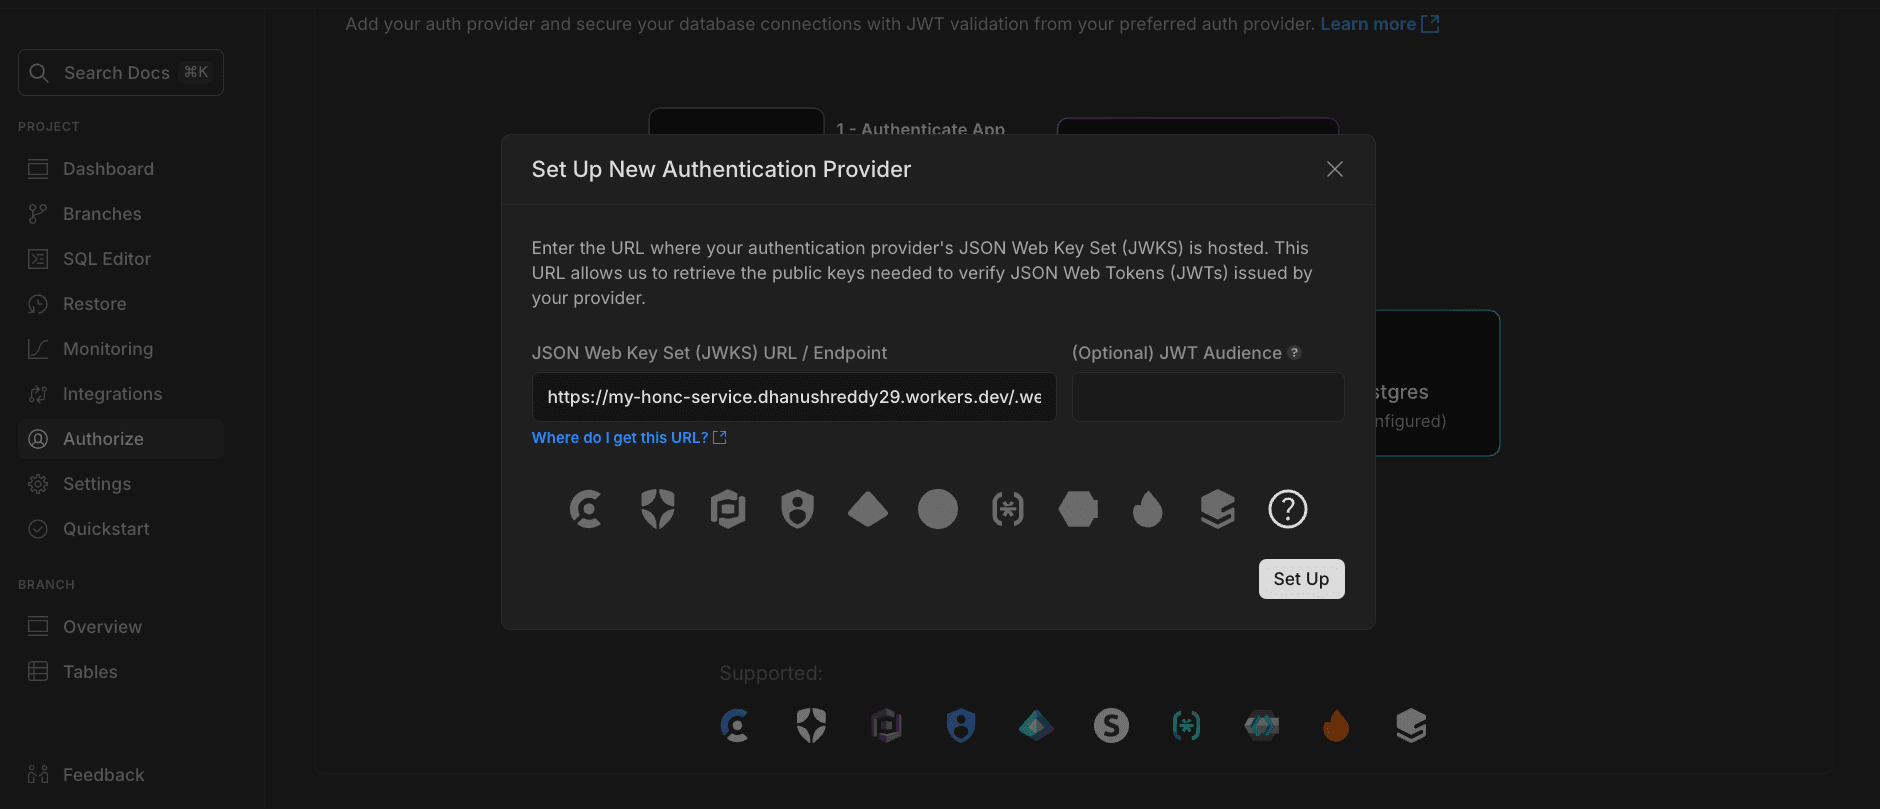
- Click Set Up
- Follow the steps in the UI to set up roles for Neon RLS Authorize. You can ignore the schema-related steps for this guide.
- Note down the connection strings for the
neondb_ownerandauthenticated, passwordlessroles. You'll need both:neondb_owner: Full privileges, used for migrations.authenticated: Used by your application, access restricted by RLS.
Authenticate requests and enforce RLS
Finally, let's use the custom JWTs to authenticate requests and enforce RLS policies with drizzle-orm.
Create RLS Policies
Create RLS policies that use the JWT claims to control access. Use auth.session() to access custom claims and auth.user_id() for the sub claim.
Example from the demo app's schema (src/db/schema.ts):
import { sql } from 'drizzle-orm';
import { pgTable, text, uuid } from 'drizzle-orm/pg-core';
import { crudPolicy } from './drizzle-orm-neon';
import { authenticatedRole } from 'drizzle-orm/neon';

export const tenants = pgTable(
  'tenants',
  {
    id: uuid().primaryKey(),
    name: text(),
  },
  (table) => [
    crudPolicy({
      role: authenticatedRole,
      read: sql`(select auth.session()->>'tenant_id' = ${table.id}::text)`,
      modify: sql`(select auth.session()->>'tenant_id' = ${table.id}::text)`,
    }),
  ]
);

export const users = pgTable(
  'users',
  {
    tenantId: uuid()
      .notNull()
      .references(() => tenants.id),
    id: uuid().primaryKey(),
    name: text(),
    email: text(),
  },
  (table) => [
    crudPolicy({
      role: authenticatedRole,
      read: sql`(select auth.user_id() = ${table.id}::text)`,
      modify: sql`(select auth.user_id() = ${table.id}::text)`,
    }),
  ]
);
Explanation:
tenantstable:readandmodifypolicies useauth.session()->>'tenant_id'to check thetenant_idclaim, ensuring users only access their tenant's data.userstable:readandmodifypolicies useauth.user_id()to get the user ID from thesubclaim, restricting users to their own records.
Use custom JWTs
import { neon } from '@neondatabase/serverless';
import { drizzle } from 'drizzle-orm/neon-http';

// ... (JWT generation logic) ...

const db = drizzle(
  neon(process.env.DATABASE_AUTHENTICATED_URL!, {
    authToken: yourCustomJWT, // Pass the generated JWT here
  })
);

// Now use 'db' to make queries. RLS policies will enforce access control depending on the JWT claims.
const users = await db.select().from(usersTable);
How it works:
- When you send a request with a JWT, Neon RLS Authorize verifies the signature using the public key.
- If the signature is valid and the JWT hasn't expired, the claims are extracted.
- The
pg_session_jwtextension makes the claims available to RLS policies viaauth.session()andauth.user_id(). - RLS policies evaluate the claims to allow or deny access.
Putting it all together
Here's a simplified example combining the key parts:
// index.ts (simplified)
import { Hono } from 'hono';
import { neon } from '@neondatabase/serverless';
import { drizzle } from 'drizzle-orm/neon-http';
import { users } from './db/schema';
import { SignJWT, JWK } from 'jose';
import fs from 'fs/promises';

// Function to create a JWT
async function createJWT(privateKey: JWK, userId: string, tenantId: string) {
  // ...
}

// Endpoint to serve the public key
app.get('/.well-known/jwks.json', async (c) => {
  // ...
});

// Example API endpoint
app.get('/api/users', async (c) => {
  const privateKey = JSON.parse(c.env.PRIVATE_KEY);

  // Replace the hard coded value with dynamic params using the request context depending on your app's logic
  const authToken = await createJWT(privateKey, 'user-123', 'tenant-456');

  const db = drizzle(
    neon(c.env.DATABASE_AUTHENTICATED_URL, {
      authToken,
    })
  );

  const fetchedUsers = await db.select().from(users);
  return c.json({ users: fetchedUsers });
});

export default app;
Conclusion
Using custom JWTs with Neon RLS Authorize offers a powerful way to implement fine-grained authorization in Postgres. By controlling JWT generation and combining it with the security of RLS, you can build robust applications that enforce data access rules at the database level. Remember to secure your private key, design your JWT claims thoughtfully, and test your RLS policies thoroughly.
We hope this guide has helped you understand how to use custom JWTs with Neon RLS Authorize.
Additional Resources
Need help?
Join our Discord Server to ask questions or see what others are doing with Neon. Users on paid plans can open a support ticket from the console. For more details, see Getting Support.